Survival guide is to be found here.
Wednesday, February 29, 2012
OM12 Survival Guide
New KB article: Removing orphaned Operations Management agents using PowerShell
KB2626752 tells the cause of this issue and how to solve it.
How To Seal a Management Pack?
However, Bing saved me a lot of time since I found this posting written by Jonathan Almquist, all about how to seal a MP. Since his posting is very detailed I have decided not to write my own posting about how to seal a MP but refer to his posting instead.
So here it is: 
However, for sealing MPs a tool is required in order to create a key. For creating this key a tool named sn.exe is required. You can download the SDK containing this tool or you can download it from my SkyDrive directly. Saves you a lot of time ![]() .
.
OM12: How to dump Management Pack Bundles (.mpb files)
Taken directly from the posting:
‘…Since the first way to understand new techniques is learning from others, or if you want via reverse engineering, one of the first steps to achieve this is to get access to MP contents and indeed we had several scripts in the community to do this . With Operations Manager 2012, a new format for MPs has been introduced: Management Pack Bundles (.mpb files). Actually Service manager had MPBs since a long time. The old scripts to dump the content of an MP file need to be updated to dump MPB as well…’
Daniele shares a PowerShell script which enables one to dump of both MP and MPB files for both OpsMgr and Service Manager. Want to know more? Go here.
So Italy isn’t only famous for its magnificent cars, food and wine but also for the PowerShell scripts! ![]()
OM12–Xplat Permissions and Sudo
‘…Within SC2012 Operations Manager it is now possible to use sudo elevation for agent push, upgrades etc, and for RunAs accounts. With this addition though, you will probably get more questions for the your UNIX/Linux admins about configuring the accounts to perform monitoring and agent tasks with the minimum amount of permissions…’
In order to address all these questions, Microsoft has written a TechNet Wiki article providing all the information you need: 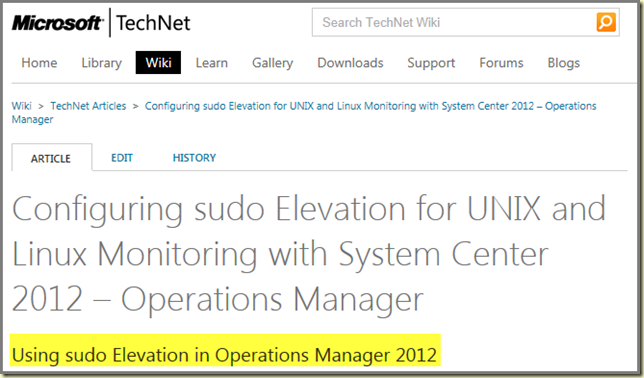
This article is a must-read for anyone monitoring Xplat with OM12.
MMS 2012 SOLD OUT!

But then again, MMS 2012 is expected to be special since 2012 is the year all System Center products will get a new version. And many people expect MMS 2012 to be THE event where all System Center 2012 products will be announced…
Monday, February 27, 2012
Testing APM with OM12 – Say hello to nopCommerce and iPad 4 running Windows 8!
Update 2nd of March 2012:
As it turns out, the latest version of nopCommerce doesn’t work with OM12 APM. Instead, read this posting all about two alternatives.
AVIcode, used for monitoring .NET applications is up to SCOM R2 a set of separate modules and additional infrastructure which has to be bought, licensed, installed and configured separately. However, with OM12 AVIcode is integrated and rebranded to APM (Application Performance Monitoring).
APM is really something special and adds so much more to the overall monitoring capabilities of OM12. Actually, it’s a world on its own. So when one runs an OM12 test environment it’s good to put APM through it’s paces as well so one knows how to configure it in production environments.
But how does one create a .NET application on the fly based on IIS 7.0? The answer is really simple: you DON’T! You download a .NET application from the internet follow a wizard and in the matter of a few minutes one has a full blown .NET application running on IIS 7.0 at hand. This .NET application represents a web shop where one can order all kind of stuff and – as an administrator – add new items and modify existing items as well. So you can add the iPad 4 running Windows 8 for instance! One has to create some bogus transactions in the web shop of course in order for APM to collect some data, but at least one has the change to test APM. Nice!
This posting will be all about downloading, installing and configuring this .NET application based web shop, titled nopCommerce. 
There is much to tell so let’s start.
Requirements
- It’s best to have a SQL Server in place. The SQL Server hosting the OM12 databases can be used for instance;
- On the server which is going to host nopCommerce install the Web Server (IIS) Role with the most common Role Services;
- Install .NET Framework 4.0 as well.
A: Download & Installation
- Log on with an account which has local admin permissions on the Web Server which is going to host nopCommerce;
- Go to this web page and hit the Install button;
- Click Install Now or wait a few seconds for running the Web Platform Installer 3.0;
- Click Run;

- Click Run;

- The installer files will be downloaded now. Just wait for some seconds;
- Click Install;

- In this setup I use another SQL Server so I select the option Use a remote server > Continue;

- Depending on your server an additional set of software (Microsoft or third party) and components will be installed and configured as well > I Accept;

- All software is being downloaded and installed. Be patient;

- Select New Web Site for the Web Site option. Enter all required information like the application name, Web Site name, Physical path, IP Address, Port and Host Name > Continue;

- nopCommerce is being installed now. Be patient;

- nopCommerce is successfully installed. Click the Launch nopCommerce link in the screen (it will open IE) and close this installation screen byy clicking Finish. The installation part is finished now.

B: Configuring nopCommerce
- As stated before IE will be opened with the nopCommerce configuration screen (this can take a while for the first time which is normal):

Don’t forget to bookmark this page! - Now you have to enter the name of the SQL server which is going to host the SQL database for nopCommerce. Even though this is a straight forward process it’s important to pay attention to these items:
- Enable the SQL Server to allow remote connections (SQL Server Configuration Manager is used as a tool for this):

- Many times the installation fails because the account isn’t recognized. Create a SQL account which has enough permissions on the SQL instance. In test environments I always make this account (nopCommerce for instance) SA. So no hassles there :).
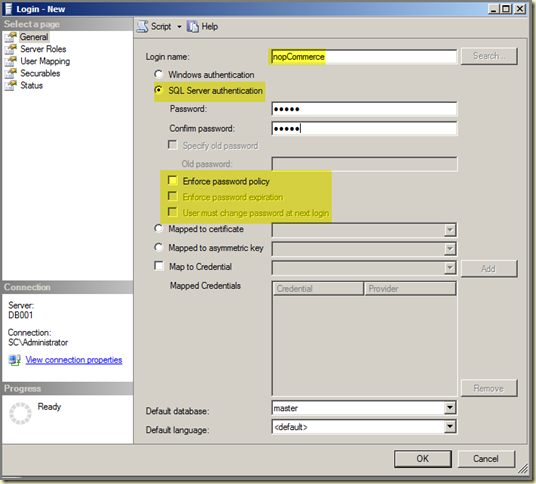
In a test environment you can deselect the option Enforce password policy;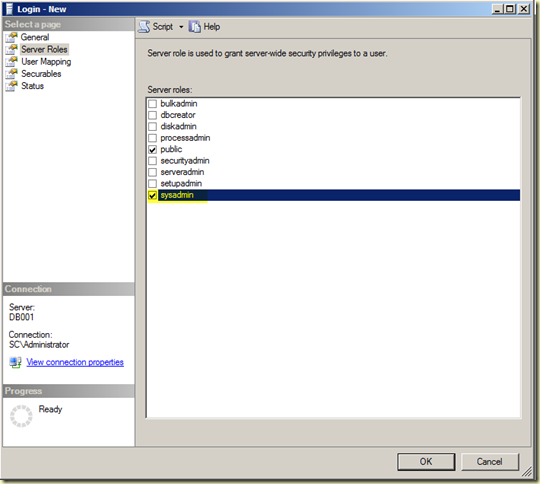
- When the SQL account is created and granted SA permissions, configure SQL Server to accept this type of Server authentication (Microsoft SQL Server Management Studio is used as a tool for this. Connect to the SQL instance, right click it and select Properties. Select Security page and set Server authentication to SQL Server and Windows Authentication mode):

- Make sure the firewalls (when enabled) allow the SQL server traffic to pass through.
- Enable the SQL Server to allow remote connections (SQL Server Configuration Manager is used as a tool for this):
- Now it’s time to fill out the installation page of the nopCommerce web site, item: Store Information.
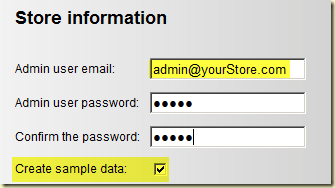
Write down the Admin user email and password. With this information you can administer the website and add the iPad 4 with Windows 8 :). Don’t forget to keep the option Create Sample data selected otherwise your store is EMPTY!!! - Item: Database Information.
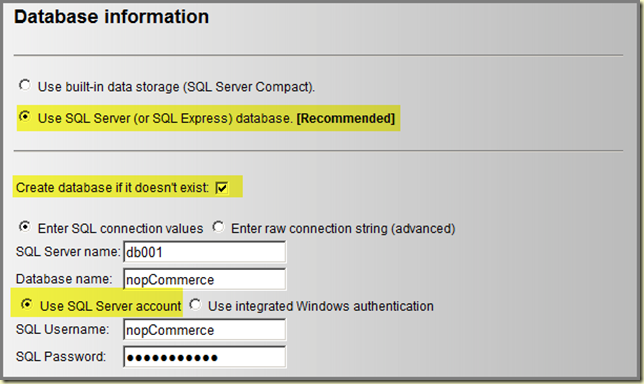
- Select the option Select SQL Server (or SQL Express) database. [Recommended];
- Put a mark in the check box Create database if it doesn’t exist:
- Enter the SQL Server name and the name of the database which is going to be created for nopCommerce;
- Select the option Use SQL Server account. - Now all the required information is provided. Hit the Install button and the noPCommerce database will be created and filled with sample data:

This will take a while, be patient…
Yes, something is happening, the nopCommerce SQL database is created: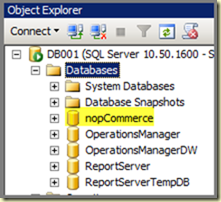
nopCommerce is still under construction:
More patience is needed I guess :) - Yeah baby! noPCommerce is OK:
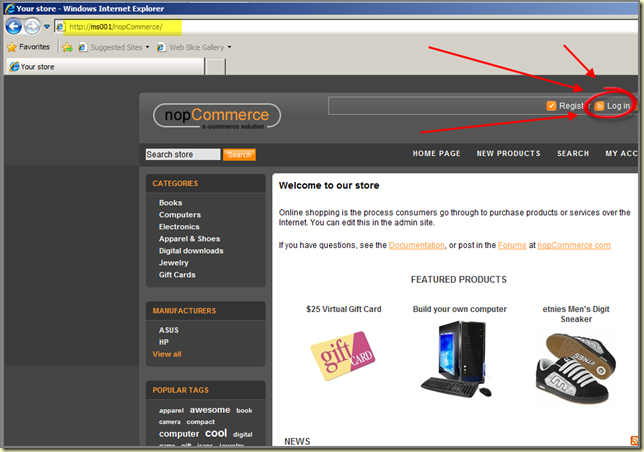
Bookmark this page! - Click on Log in and use the Administrator credentials (see B3) and click Administration. Now you can add your iPad 4 with Windows 8 item:
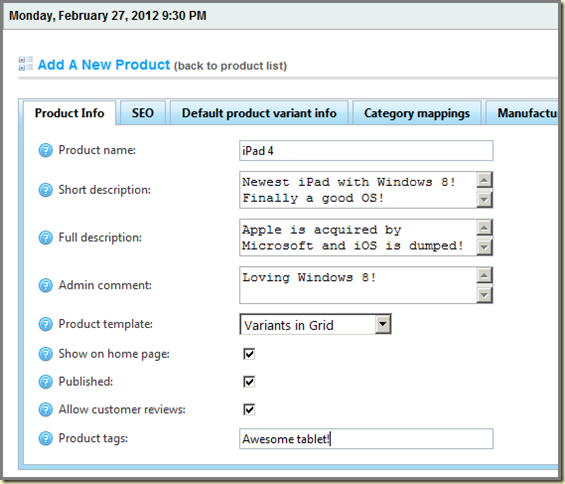
Now nopCommerce is in place and functional. In a later posting I will describe how to setup OM12 RC for monitoring the nopCommerce web application. So stay tuned!
Friday, February 24, 2012
OM12: Improved Health Explorer
Main reason for this load time is the fact every single Monitor relevant to that server is loaded and shown. In OM12 the behavior of Health Explorer is changed. Now only the unhealthy Monitors will be shown, like this: 
This saves a lot of loading time thus making Health Explorer far more snappier. Another thing is that now only the relevant Monitors will be shown enabling one to zoom in much quicker to the issue at hand. So all the clutter/noise is removed.
Nice!
SCOM Super Tools updated for OM12
- Override Explorer
- MP Viewer
- Proxy Settings
Sadly Boris has left the OpsMgr Team in order to pick up another challenge within Microsoft. He will be missed for sure. However, there is good news as well. Daniele Muscetta has updated the code of these tools so they work with OM12 as well. These tools can be found here.
Good to know:
These tools are provided "AS IS" with no warranties, and confers no rights. Use of included utilities are subject to the terms specified at http://www.microsoft.com/info/cpyright.htm
Monday, February 20, 2012
General overview of the Security Model for SCOM/OM12

In a nutshell all the required information (and resources!) are described in that posting. So it’s a good starting point for any one running a SCOM/OM12 environment.
The posting can be found here.
Testing the network monitoring capabilities with OM12
Jalasoft has such a tool, for free. Kevin Holman has written a posting about this tool and how to set it up. Want to know more? Go here. 
(Picture taken directly from Kevin’s blog posting.)
System Center Orchestrator 2012 Component Add-ons and Extensions available for download

Whenever you’re testing the RC of SC this software is a requirement. It can be downloaded from here.
SCOM R2/OM12 and Linux: Some very good resources
Of course, all of us know very well how to setup a test lab running Windows VMs. But how about setting up a test lab with Linux VMs? After all, we want to test monitoring of cross-platform with SCOM R2/OM12 so those Linux VMs are a requirement. And yet, we build the test lab in order to learn more about it. 
Gladly there are two highly respected fellow MVPs who posted very good stuff about just that! Pete Zerger and Cameron Fuller went to great lengths in order to explain how to setup a test lab with Linux VMs. Of course, based on Hyper-V.
Want to know more? Check out these AWESOME postings:
- Pete Zerger: Linux Configuration Resource Kit for System Center Administrators;
- Cameron Fuller: Installing and working with Unix/Linux in SCVMM 2012 RC.
All credits go to these two guys. Thanks Cameron and Pete for sharing this kind of information. Awesome!
Friday, February 17, 2012
System Center Universe Recordings are available now

For the ones who couldn’t attend it’s good to know the video recordings and PowerPoint presentations are available for download from here. 
nWorks MP for VMware updated!
- Ghost Computers are gone!
Up to version 5.6 there was this nagging issue of unmonitored Windows Computers. What happened was that the nWorks MP detected the VMs hosted by the VMware ESX(i) servers and piped it into SCOM. However, a relationship between a VM and a Windows Computer was created as well. As long as the VM ran a SCOM Agent, nothing was wrong. But when the VM was nothing but a test server without a SCOM Agent, the VM would show up in SCOM as an unmonitored Windows Computer. I have seen environments with many unmonitored Windows Computers because of that.
With the latest version of the nWorks MP this is remedied. Nice!
- Reports: More, better & improved!
What’s a good MP without any Reports? Exactly, a bad MP! Also when the MP has Reports but they aren’t good enough, the overall quality of the MP is affected as well. The nWorks MP already had good reports. In the latest version however, new Reports are added, existing ones are totally rewritten. So all you ever wanted to know about your VMware environment, but didn't have the time for it, it’s there now with a single click on the mouse button!
- vSphere 5.0 support
VMware ESXi 5.0 and VMware vCenter Server 5.0 are fully supported now, also the new metrics. These metrics are monitored and collected as well. So one gets an even better grip on the VMware ESXi 5.0 environment. Nice!
- CIM-XML protocol support
With this protocol hardware data is collected directly from the ESX(i) hosts. This reduces the overhead on vCenter and exposes more sensors as well. A welcome side-effect is that the ‘noise’ (Refresh Hardware Information’ events in the VI-Client) is gone as well. I know many VMware admins who will love this one!
- New Views and Dashboards
This version of the nWorks MP has new Views and Dashboards. So with a single glance one gets a better and detailed status information about the VMware environment.
But there is much more to it as well. Want to know more? Want to test drive it yourself? Go here. IMO, this MP is very good and adds much functionality to any existing SCOM environment out there. Whenever you run VMware and you have SCOM in place as well, you really need this MP.
Sometimes people tell me they already have vCenter in place, so why bother? However, vCenter is primarily a resource manager tool with some basic monitoring capabilities. The nWorks MP – in conjunction with SCOM – brings the monitoring of your VMware environment to whole new level.
Thursday, February 2, 2012
SCOM R2 Gateway Server Approval Tool fails with error: ‘The gateway name already exists as a computer instance.’
Got this interesting error today when trying to install a new Gateway server. It really puzzled me. Since this server wasn’t present at all in SCOM. It was a brand new server provisioned in a VMware environment. No Agent present on that server nor was it Agentless monitored. And yet when I ran the Gateway Approval Tool I got an error stating: ‘The gateway name already exists as a computer instance’.
Cause
Hmm. Wait! The VMware environment itself is being monitored by the nWorks Veaam MP which is older then version 5.7 (it has to updated soon). And the versions older then 5.7 of that MP have a small issue to reckon with: whenever a VM is detected it’s piped into SCOM and a relationship with a Windows Computer Object is created. Whether or not a SCOM R2 Agent is in place or not. Since this VM didn’t run a SCOM R2 Agent but was picked up by the nWorks Veeam MP it turned up into SCOM R2 as an unmonitored Windows Computer Object. And very hard to remove.
Resolution
The PS cmdlet Remove-DisabledMonitoringObject didn’t work here so it was time for more drastic measures.
Be aware though it may wreck your SCOM database, so make a valid back up of it before you go ahead. Also good to know is that I am not responsible when your DB dies. (Anyhow, I have used this trick some times already and until now with no DB corruption…).
Preparations are key here since when the unmonitored Windows Computer is removed out of SCOM, the Gateway Server must be installed ASAP. Otherwise the computer will be back and might wreck the installation of the Gateway Server again. So in order to stay away from that scenario, prepare the installation of the Gateway Server in such a manner you can move fast.
Preparation
- Create the required certificates (for the Gateway Server and the Management Servers) and install them;
- Copy the required installation files to the Gateway Server and don’t forget the MOMCertImport.exe tool AND CU#5;
- Create the required syntax for the SCOM R2 Gateway Server Approval Tool and keep it at hand;
- I found the required query on this blog posting (thanks Maarten Goet for sharing). Read this posting twice so you know what you’re doing;
- Open SQL Server Management Studio and make a backup of the SCOM R2 database.
The Real Deal (and now you’ve got to move FAST!!!)
- When the backup is OK run the query as stated on Maarten’s blog;
- Check the SCOM R2 Console for the unmonitored Windows Computer which must become the Gateway Server. You’ll see it’s gone now;
- Run the Gateway Server Approval Tool. It will succeed now;
- Install the Gateway Server right after it;
- Run the MOMCertImport.exe tool in order to map the correct certificate to the SCOM R2 Gateway instance;
- Now in SCOM R2 the SCOM R2 Gateway Server is accepted;
- Wait until the Gateway Server shows up healthy in the SCOM R2 Console;
- Install CU#5 and be HAPPY!